If you find your cordless tool storage is disorganized or just not enough, these are the best cordless tool storage plans with easy to follow instructions! This entire organizer can be made with one sheet of plywood and we’ve provided a guide so you know exactly how to cut to optimize your sheet of plywood.
This self will allow you to organize your current power tools and batteries for a quick and easy grab. This power tool shelf has made it so much easier to find the power tool batteries we need, quickly grab the right drill, and have an accessible space to keep battery chargers.
Why is this cordless tool storage better than a regular shelf?
A lot of the organization of this shelf comes from the cordless drill storage rack on in the bottom open slots which makes it easier to identify which one is best for the the project and quickly grab it, rather than shuffling through a drawer in a tool chest or trying to remember where you set your drill down from your last project.
Will the spacing work for any cordless tools?
We have primarily Ridgid Power Tools, so that’s what we designed the spacing for. If you don’t have an abundance of drills like we do, you could also store flashlights, a multitool, or Ridgid’s SubCompact saw.
We recommend checking the widths and heights of the tools you’d like to put on this shelf to ensure they’ll fit or adjust the cuts for the size of your tools. Changing the width of the slots will not hurt the integrity of the shelf as long as there’s about 1.5″ of space between each one to support the weight of the tools. You can also adjust the top and middle shelf heights to allow for enough space for the items you’d like to store.
Materials Required:
- 1 Sheet of 4’x8’x 3/4’’ Plywood (Cabinet Grade or Sandee Ply)
- GRK Fasteners #8 x 1-1/2 in. Star Drive Trim-Head Finish/Trim Screw
- GRK Fasteners #10 x 3-1/8 in. Star Drive Washer Head RSS Structural Screws
- Titebond III Wood Glue
- 2’’ – 18 ga Finish nails (Optional)
- Paint (If you want to have a paint finished project)
Tools Required:
- Table Saw or Circular Saw (your local home improvement store can get close on the cuts)
- Drill or Impact Driver with a T10 Star Drill Bit (usually included in GRK Fasteners Box
- Jig Saw with scroll blade
- 18 ga. Finish nailer (Optional)
DIY Skill Level: Intermediate
Time Frame: 3-4 hrs.
Budget: This project was less than $65.00 at the time of this post
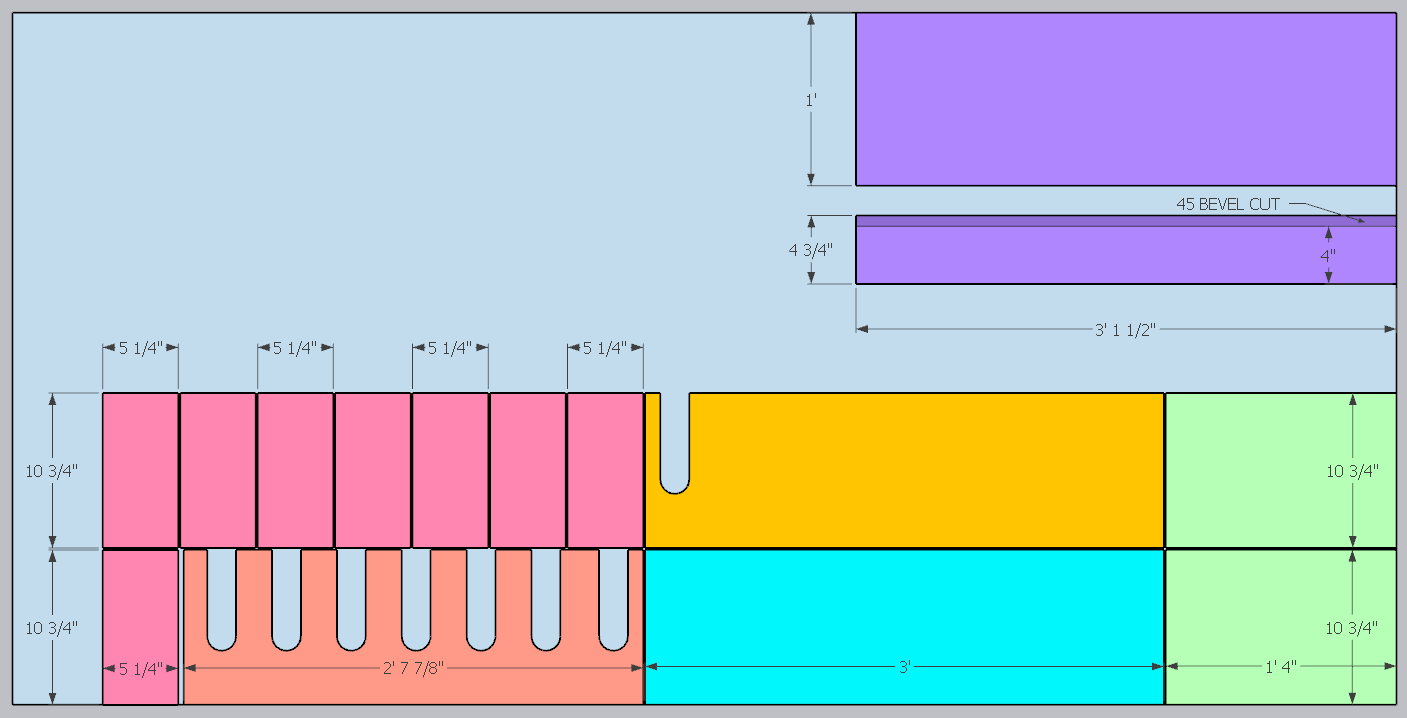
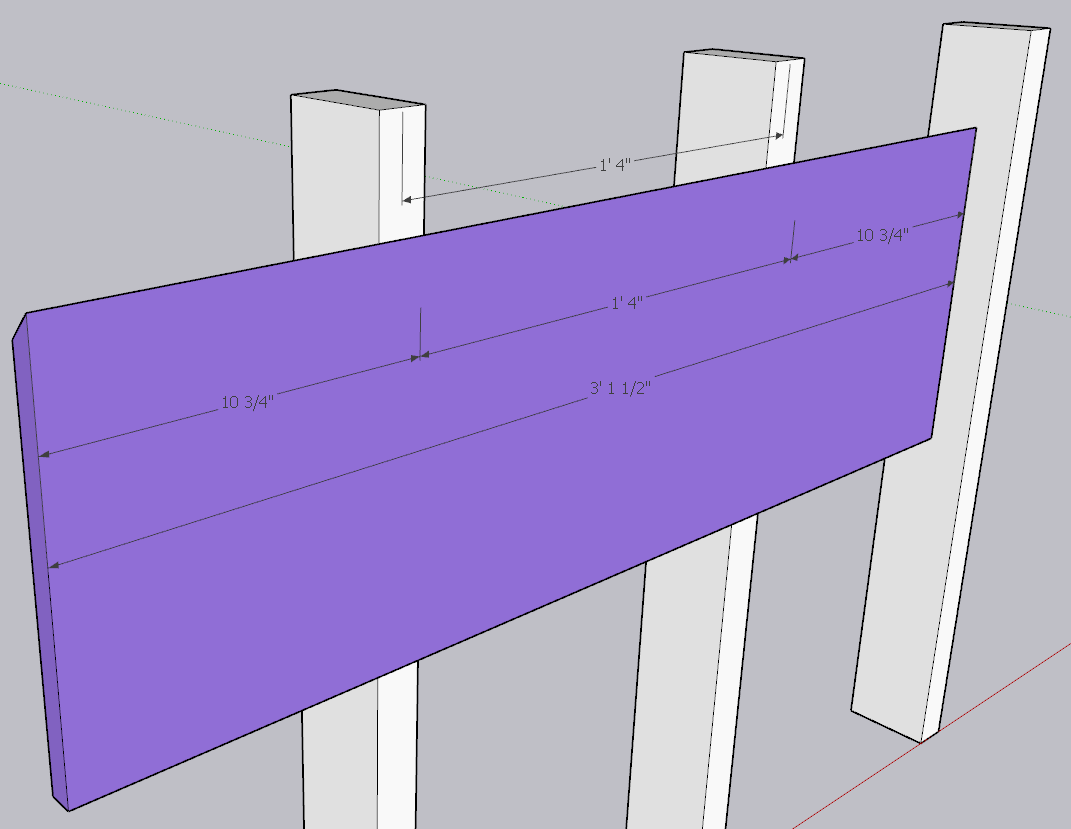
Material Cut List:
| Qty. | Width | Height | Purpose | Note: |
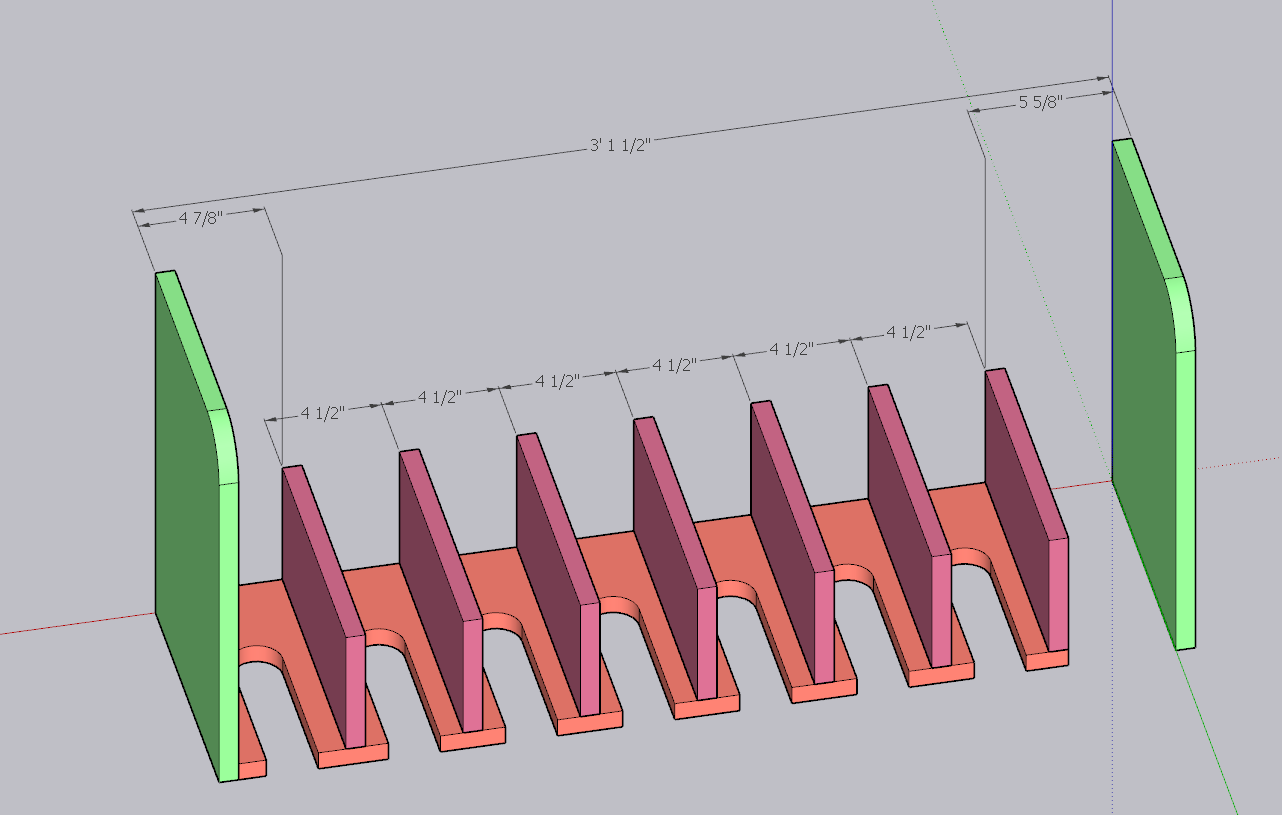
| 8 | 5 ¼” | 10 ¾” | Dividers | |
| 2 | 12’ 4″ | 10 ¾” | Side Panels | |
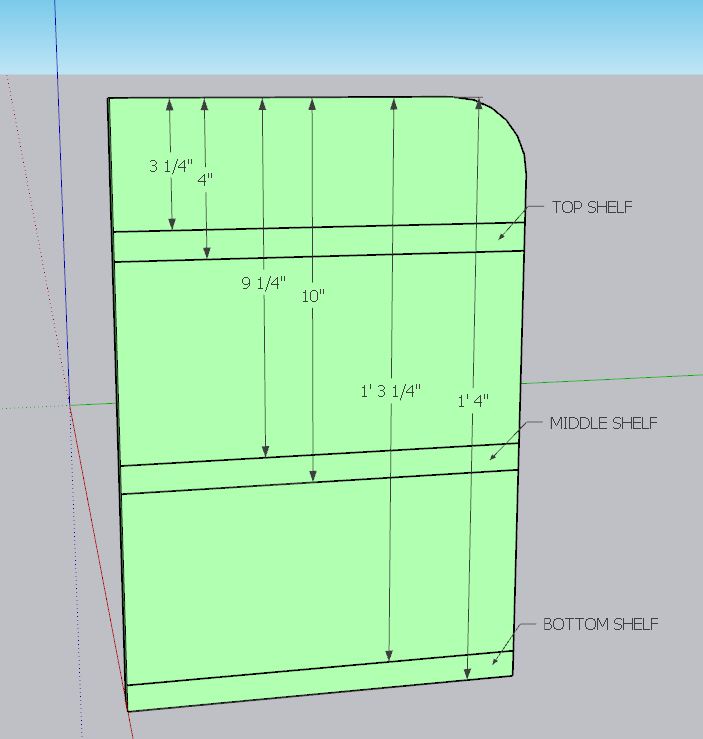
| 2 | 3′ | 10 ¾” | Top and MidleShelf | Middle Shelf will have a notch |
| 1 | 2′ 7 ⅞” | 10 ¾” | Bottom Shelf | |
| 1 | 3′ 1 ½” | 4 ¼” * | Back Panel | Long edge has a 45° bevel cut |
| 1 | 3′ 1 ½” | 1′ * | Back Panel | Long edge has a 45° bevel cut |
Building the Cordless Tool Organizer:
- Start by cutting all the necessary parts from the sheet of cabinet grade plywood by using the provided cut list. If you do not have access to a table saw for the long rip cuts, you can ask your local home improvement store to cut them out using the panel saw.
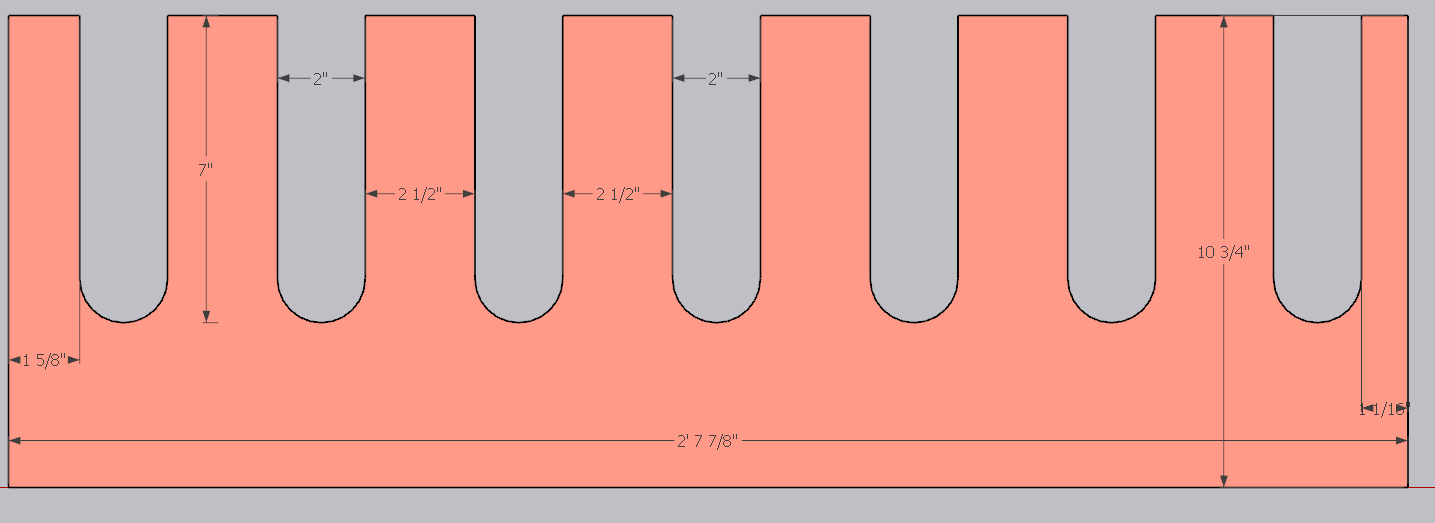
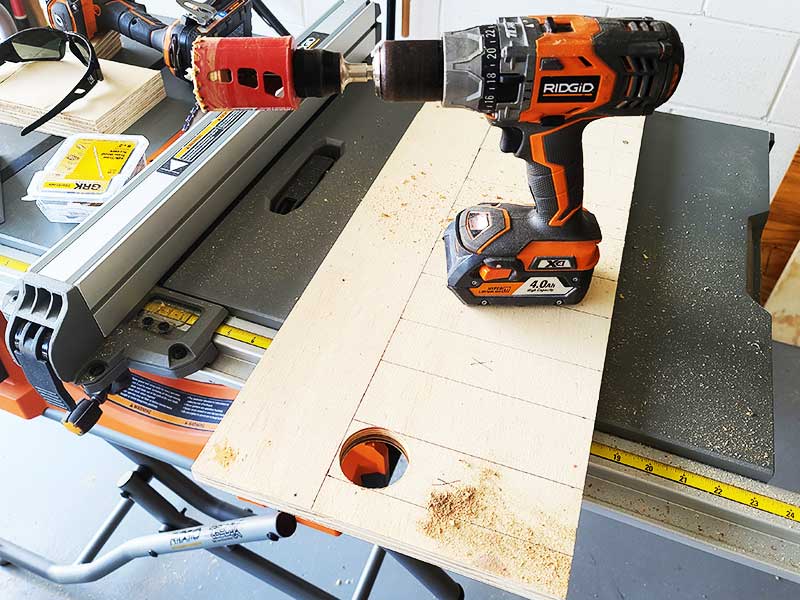
- Space out and measure the tools slots on the bottom shelf. Cut the openings using a jigsaw with a scroll saw blade. Make sure you verify the handle width(s) of your tools before cutting the tool slots.
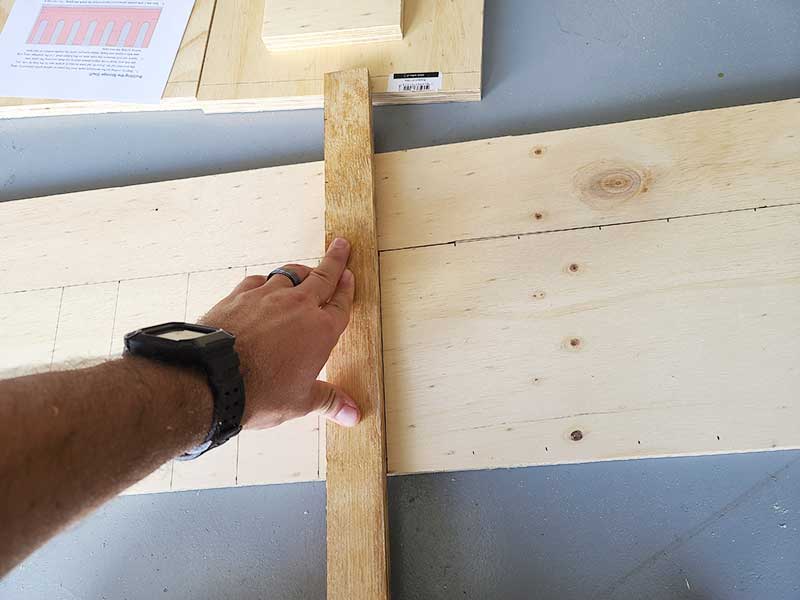

- Take the 2 side panels (green) and layout where the shelfs are going. You can use a piece of scrap or straight edge to draw a line across the panel. You can round over the edge or taper it if you want to add a design element.
- Add glue to each edge of the bottom shelf (peach color) and screw into place on only one side panel making sure that the tool slots are facing outwards. You can also nail in place temporarily using an 18 ga. Finish nailer and then go back with screws later.
- Evenly space glue and nail the dividers (pink) to the bottom shelf. The void on the far right will be used to hold longer tools like a reciprocating saw.
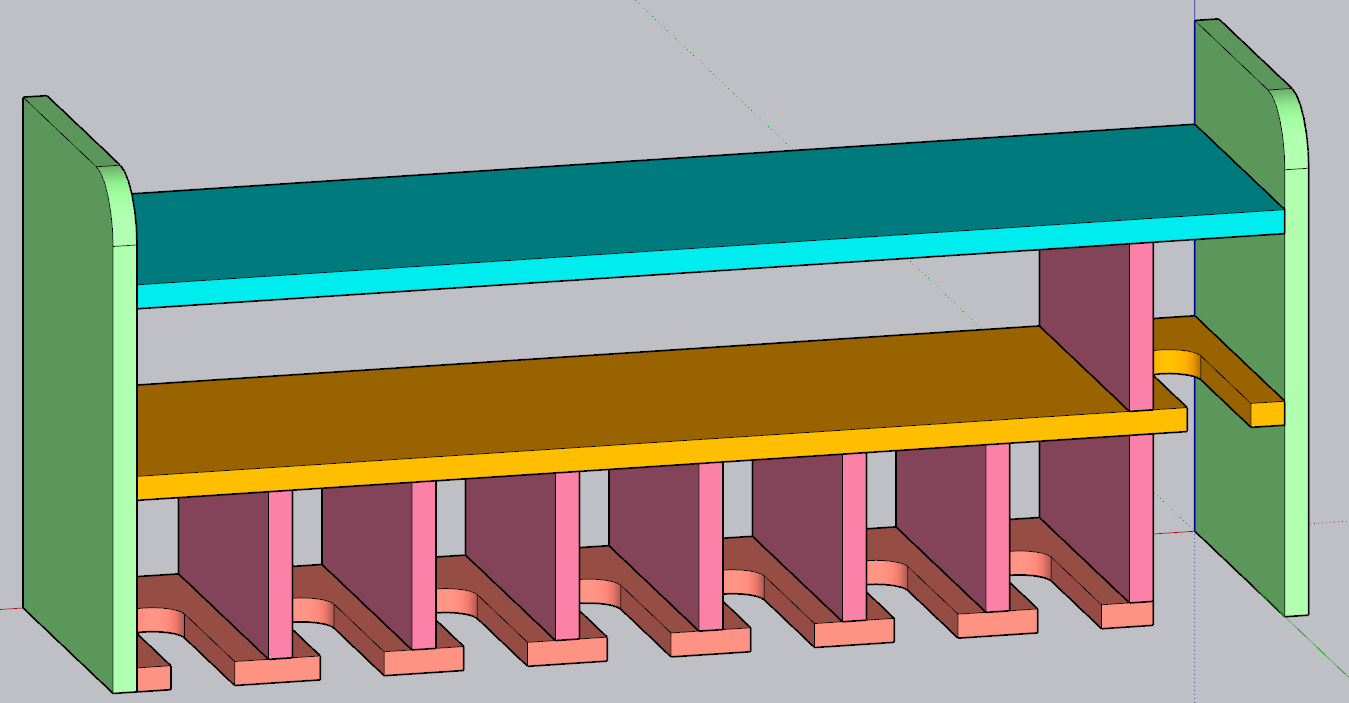
- Continue building up the shelf by nailing/screwing and gluing the middle shelf (orange) to the divider’s and the side panels. The last divider will need to be installed at this time.

- Install the last shelf, similar to the last one using glue, nails, and/or trim screws. The shelf is now mostly assembled with the exception of the back panel.
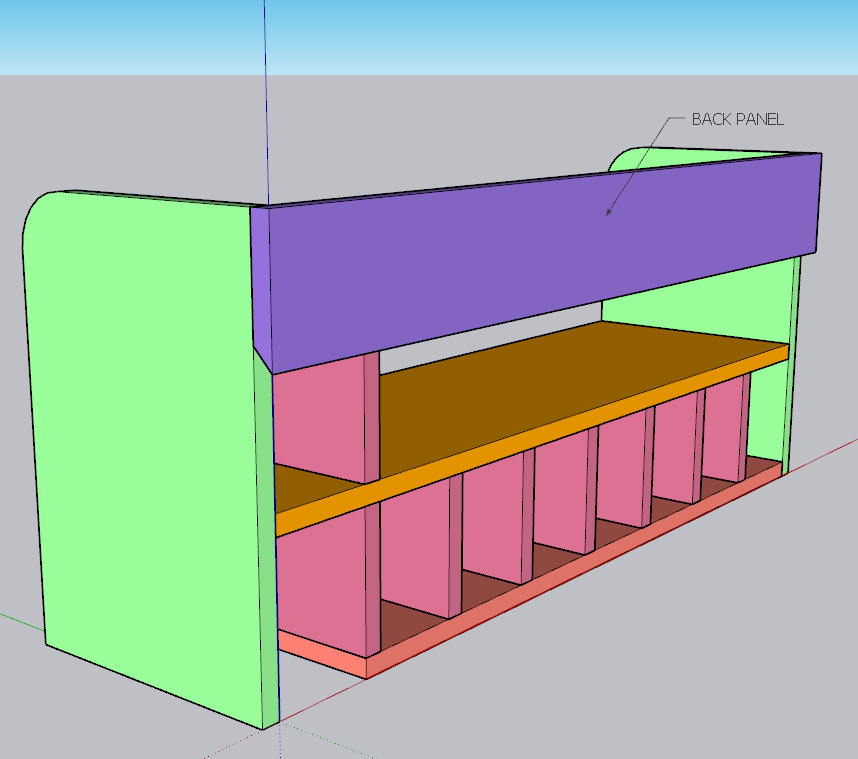
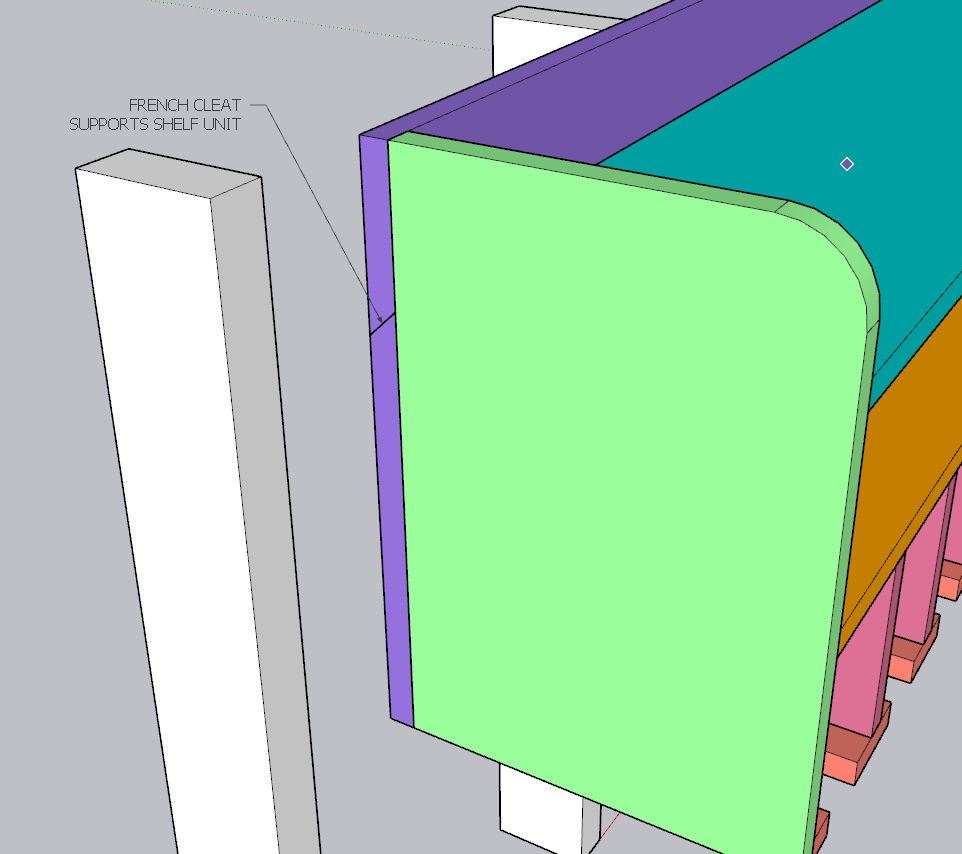
- The back panel is broken up into 2 sections for easy mounting to a wall. The skinny section will be glued and screwed together on the sides and into the top shelf.
- If you’d like to paint the shelf, you can do this now.
Hanging the Cordless Tool Storage:
- Mount the larger section of the back panel to the wall, anchoring into at least 2 of the wall studs using GRK RSS Structural 3’’ Screws. You will want to install a minimum of 2 screws per stud. These screws are great for heavy applications such as this one because of the large washer head and superior holding power. (Drywall not shown for clarity)
- Finish the install by sliding the organizer over the wall-mounted back panel. The angle cut of both panels will interlock creating a secure connection. This is known as a french cleat.
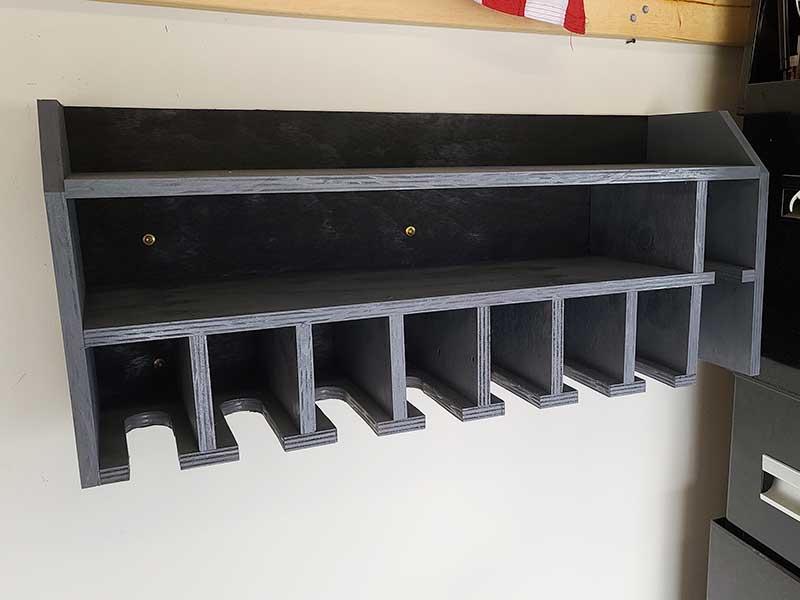
This cordless tool storage has been instrumental for keeping our batteries, drills, and other power tools organized and available for easy access. The cordless drill storage rack makes all the difference and added shelving is perfect for storing and charging batteries. It was easy to build at a low cost and gives the garage another professional touch.
Would this power tool shelf help organize your garage? Fill out the form below to instantly get a printable PDF of the cordless tool storage plans to use as a guide while you build your very own cordless tool organizer.
Check out more of our latest DIY projects:
No post found!