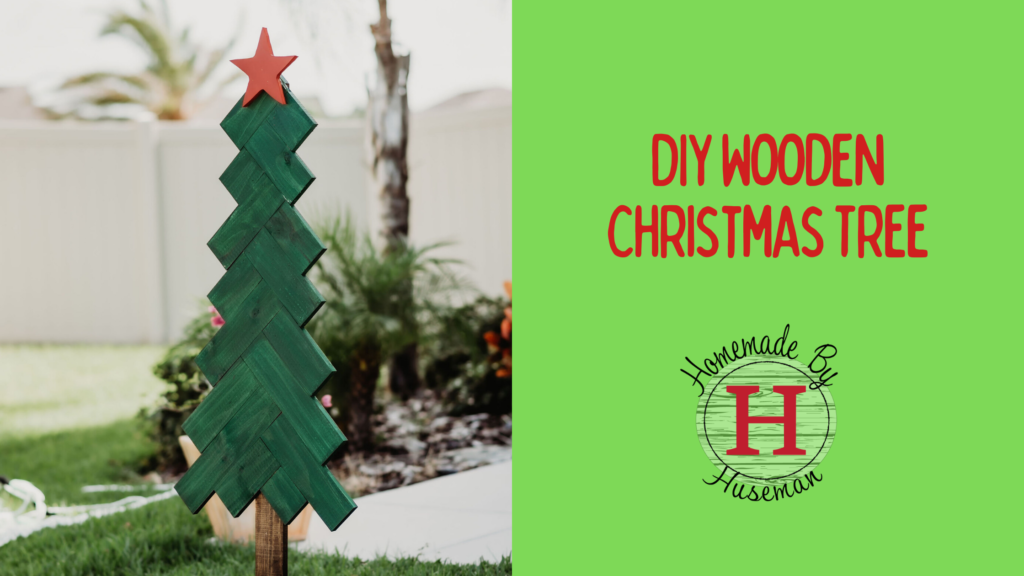
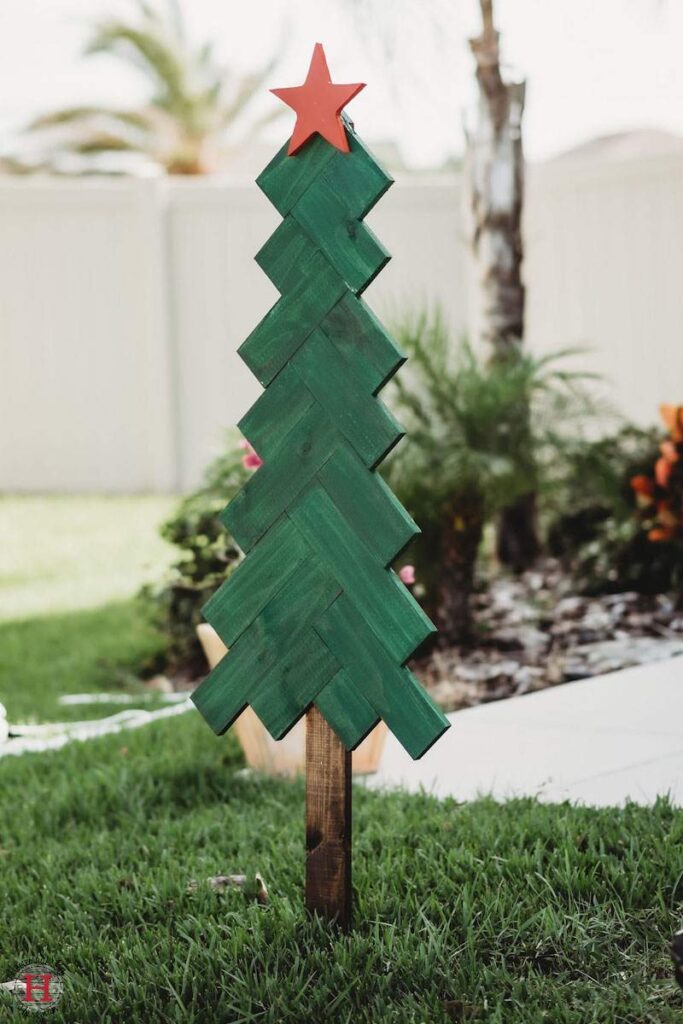
This DIY wooden Christmas tree is the perfect addition to your holiday decor. It’s easy to make in just an afternoon with a few materials. It offers a warm and cozy feel with options to personalize the colors and size to fit your decor. You can also opt to make this a pallet wood Christmas tree for a more rustic look, but since we couldn’t find pallets we liked we used 1×4 pressure-treated pine wood so it would last longer outside.
If you prefer to keep your wooden Christmas tree inside or on a patio, we suggest making an X-shaped base to attach to the bottom of the “trunk” instead of a sharp point to use as a stake in the ground. The best way to attach this X base is using pocket screws and a Kreg-jig, but it’s not necessary.
While this is a quick and easy project, having the right tools makes a big difference. A miter saw makes precise, straight, and quick cuts, but in a pinch, you could use a circular saw or a hand saw. Ideally, you want straight cuts with the right measurements to avoid unusual gaps between each piece of the tree when puzzling them together for the Christmas tree look. A finish nailgun also helps the speed of the project, but a standard hammer and finish nails will still keep the wood in place, just be cautious not to leave divots in the wood that might be more obvious once it’s stained.
When it comes to the stains and colors, the sky’s the limit. We used a pretty standard green and brown, but any stain will do for this wood Christmas tree to fit your decor. Want a gold and purple tree – go for it! Prefer a more natural wood look, skip the stain entirely!
Looking to add more to your outdoor decor? Don’t miss our tips and tricks on how to hang your Christmas lights like a professional. And if you like this project, we think you may also like our wooden Christmas tree box for your real Christmas tree.
Required tools
- Tape Measure
- Speed square or straight edge
- Miter saw, circular saw or hand saw
- Hammer or finish nail gun
- Pen or Pencil
- Jig saw or coping saw (for cutting out the star)
- Staining pad or foam brush
Materials Used
- 3 – 1x4x8’ Pressure Treated Wood (PT) or 1×4 pallet wood strips
- 1-¼’’ long Finish Nails
- Solid Color stain (we used Minwax Green Tea – Tree Branches)
- Semi-Translucent Stain (we used Minwax Espresso – Trunk)
DIY Skill Level: Beginner
Time Frame: 3-4 hrs.
Budget: Materials for this project were less than $40.00 at the time of this post
Steps to build a DIY Wooden Christmas Tree
- Start by using this link to download the FREE template guide for the DIY Christmas Tree cut guide with this link and print the plans out.
- Based on the template guide, measure out the individual wood pieces for the tree on 2 of your 1×4’s and then cut them into those individual pieces.
PRO TIP: As you cut the individual pieces, label one side with the length that was just cut (i.e. If it is an 8’’ longboard, label it as 8’’) to make the assembly faster when trying to put the tree together


- On the third 1×4, find the center of the 3.5’’ face of the board and mark it.
- With a speed or carpenters square, measure two 45 degree angles to create a 90 degree corner


NOTE: If the point is NOT centered on the board, the layout of the branches could be thrown off enough making nailing to the 1×4 trunk difficult as the nailing field starts to become very narrow
- Using the provided guide, start laying out the cut 1×4’s per the plan and installing them using 3 to 4 finish nails (by hand nailing or nail gun)
- Once you have finished installing all the branches, cut the bottom of the trunk into a VERY SHARP point. Make sure you cut it longer than you want so you can hammer the trunk into the ground. Or your can opt to attach an X-base to keep it sturdy on a flat surface.
- Finishing the wooden Christmas tree is rather simple! Using the stain, paint the branches your desired color and the trunk and darker color or your personal preference.


Optional Star for Your DIY Wooden Christmas Tree:
- The provided guide includes a 1:1 scale of an 8’’ wide star. Make sure that you print it out full-sized on a sheet of letter paper
- Cut it out and lay it out on a piece of scrap wood (plywoods or a 1×10 minimum) and then trace it out
- Using a jigsaw or coping saw, cut along your trace lines
- To finish the star, apply a coat of paint (Spray paint is okay) with a color of your choice
- Once the star is dry, attach it to your tree using about 4 finish nails

We found this diy wooden Christmas tree to be the perfect addition to our outdoor Christmas decor. After figuring our the perfect measurements for the tree branches, creating the rest of the tree was a breeze – so we’ve already done the heavy lifting for you! If you make this tree make sure to share it with us by tagging us on Facebook, Twitter or Instagram.
Merry Christmas & Happy Holidays!
Check out more DIY projects:
No post found!
Great content! Keep up the good work!